Adventures in tinkering, or how I jailbroke my BLE Sense
Last updated: 2021-03-13
Would you like to program your Arduino 33 BLE Sense with something other than Arduino?
What is the BLE Sense?
The BLE Sense is without a doubt a great little board. It has a fast yet power-efficient Cortex-M4 class microcontroller, lots of memory, Bluetooth Low Energy connectivity, and a whole bunch of sensors:
- temperature, humidity and pressure
- light, color and gestures
- 9-axis IMU (accelerometer, gyroscope and magnetometer)
- a microphone
It is pretty much the board when it comes to machine learning on embedded devices: it’s featured in the TinyML book, the TinyML course by HarvardX and the Embedded Machine Learning course by Coursera. It’s also officially supported by EdgeImpulse, which will allow you to start experimenting with TinyML right away.
In general, Arduino (as in programming language, the C/C++ dialect) is pretty great, especially if you want to focus on the project itself and not the bare metal details. Sometimes it’s a little opaque, though, and abstracts a whole bunch of things away from the user.
So what if you want to go beyond the Arduino?
In my case, I wanted to try programming it with Rust*. I already had some experience with the nRF52840 on the Adafruit’s ItsyBitsy board with the same MCU, but then the BLE Sense has all those nice sensors, too, so I wanted to give it a try.
* you could also use C/C++ with or without Nordic SDK, or (something I haven’t tried myself) TinyGo or CircuitPython
The problem is, BLE Sense has its own specific bootloader. It works well with Arduino IDE, but that’s pretty much it. In order to do anything else you need to replace it with some other bootloader that will allow you to flash the board with the firmware of your choice, e.g. written in Rust. Adafruit to the rescue!
Making the bootloader
What you need to do is clone the repository with Adafruit nRF52 Bootloader, and then build it for the Nano 33 BLE board like so:
git clone https://github.com/adafruit/Adafruit_nRF52_Bootloader.git
cd Adafruit_nRF52_Bootloader
git submodule update --init
make BOARD=arduino_nano_33_ble all
This will take a moment, and after it’s done, you’ll see that there’s now a folder _build/build-arduino_nano_33_ble with multiple files. The one you need is this one:
arduino_nano_33_ble_bootloader-0.4.1_s140_6.1.1.hex (it also contains the Nordic SoftDevice S140 v.6.1.1).
But how can we flash the board with it?
Exposing the SWD interface
Here’s where you need to do a little modification to the board itself. It’s not very difficult, but requires some basic soldering skills, and some patience.
Arduino designers didn’t include any pins for the Serial Wire Debug (SWD) interface, but luckily left the soldering pads exposed at the bottom of the board:
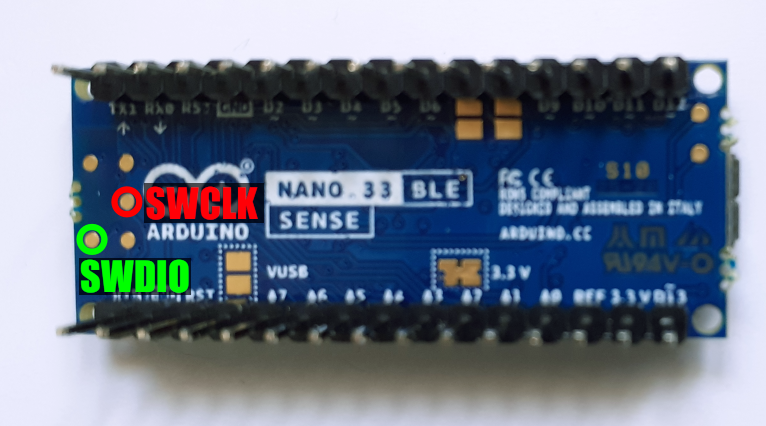
You can also see it on the pinout.
In hindsight I can tell that only the two pins (SWDIO and SWDCLK) seem necessary for this operation, I didn’t connect the RESET pin. It also makes a lot of sense to somehow secure the attached wires to the board, as they may easily detach otherwise.
Flashing the bootloader
Once we have the SWD interface available, all we need is to put this .hex file on the board. It can be done with Segger J-Link, but I didn’t have one handy, so I used the Black Magic Probe instead. To be specific, I used the cheap “blue pill” STM32F103 board with the BMP firmware flashed, as explained here and here. It’s limited compared to the original, as it only has SWD interface and no JTAG, but will do just fine here.
All you need to do is connect the new SWDIO and SWCLK of the BLE Sense board to their relative BMP counterparts, and also connect +3V3 and GND from the BMP to the right pins of the BLE Sense (check pinout for the correct pins). After that you run GDB on your computer, and run the following commands:
gdb
target extended-remote /dev/ttyACM0
monitor swdp_scan
attach 1 (Nordic nRF52 M4)
load arduino_nano_33_ble_bootloader-0.4.0-2-g4ba802d_s140_6.1.1.hex
kill
It does the following:
- connects to the BMP on port ttyACM0 (or whatever your serial port may be)
- scans for available SWD targets
- attaches to target 1, which is the Nordic nRF52 M4
- loads the firmware to the board
- resets everything
Let there be blinkenlight!
Now after you disconnect the BMP and attach the BLE Sense to the computer, you’ll see that it shows up as NANO33BOOT flash drive. To test whether everything went smoothly, you can flash it with this simple blink example I made with Rust (GitHub repository here).
All you need to do is install Adafruit’s version of nRFutil, put the board into bootloader mode (you’ll see a drive named NANO33BOOT appear) and then execute the following instruction in the folder where you stored the blinky.zip:
adafruit-nrfutil dfu serial --package blinky.zip -p /dev/ttyACM0 -b 115200
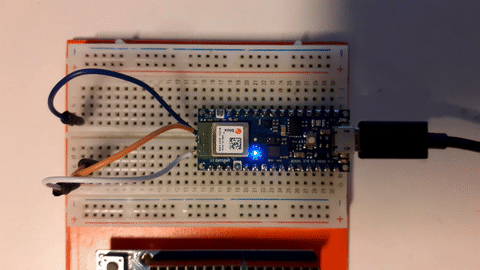 And here’s a BLE Sense (with SWD wires still attached) happily blinking the blue LED with the Rust code. I really wish I had secured the wires better, they detached shortly after flashing the bootloader, which is a bummer as I can’t use BMP or J-Link to debug the board (but the flashing over the bootloader works great).
To be continued! In the next post I will explain more about the Rust code, and how to get the sensors to work.
Stay tuned!
Categories: rust embedded arduino tinyml